 I love baking! I'm not afraid to admit that I'm really into my "granny" hobbies. Baking, jam/chutney making, sewing, I love it all!
One of the things I am most proud of is my Victoria Sponge. I make it a lot, and always get asked about it and how I make it, so I have put together this little post with the recipe and method etc. My recipe is based on a lovely recipe by Hugh Fernley-Whittingstall and my Nan's all-in-one sponge recipe, with a few tweaks here and there.
This recipe is for a sponge made in 8 inch diameter tins. I normally use two shallower tins however I have made it as one cake, in a deeper tin and then cut in half. I use a hand mixer to combine my ingredients, a bit of a no-no for sponge cake purists, but I find it A LOT easier and makes a lighter sponge!
Ingredients:
For the sponge cake
* 4 medium free range eggs
* Self raising flour
* Caster sugar
* Softened unsalted butter
* 1tsp Vanilla essence (optional)
* Pinch Salt
* Jam
* Icing sugar to dust
For the butter icing
* 280g Icing sugar
* 140g of soft, unsalted butter
* 1-2 tbsp milk
* 1/2 tsp of Vanilla essence
Sponge Method:
 1. Preheat the oven to 180*/350*F gas mark 4.
 2. Put the 4 eggs (in their shells) in the bowl of your scales and make a note of the weight.
3. Break the eggs into a small bowl and beat together with the salt and vanilla essence (if using).
4. Weigh an equal amount of each, softened unsalted butter, caster sugar, and self raising flour.
 5. Add the caster sugar to the butter and "cream" together until light and fluffy. NB: If you're not used to baking terminology "creaming" the butter and sugar just means mixing together until its a nice, smooth, fluffy consistency.
6. Add the egg mix to the sugar/butter 1/4 at a time, mixing thoroughly until a smooth batter is formed. Sometimes the mixture can split, this can be prevented by adding a spoonful of flour before the last 1/4 of egg.
7. Next add the flour, a small amount at a time, continuously mixing until all the flour has been added and a lovely smooth mix is formed.
 8. Divide the mixture between the two lined tins (have a look at the end of the recipe for how to lining cake tins).
9. Pop the cakes in the oven for 25-30 mins. Remember DO NOT keep opening the oven to check on the cake! Opening the door lets out the heat, and is a sure-fire way to end up with flat sponge cakes! Be patient, and wait until about 20-25 mins before you check the cake!
 Tip: You can use a skewer or a cocktail stick to check the cake is cooked through. You should be able to remove the skewer cleanly.
10. Leave the cakes, in the tins, on a wire rack to cool before removing from the tins. Leave the sponges to cool completely before trying to ice. This is a great time to make the butter icing!
Butter Icing Method:
1. Beat the butter until smooth in a bowl
2. Add half the icing sugar and the vanilla essence and beat until smooth.
3. Add the remaining icing sugar and 1 tbsp of milk and beat until smooth and creamy, add remaining milk if if required.
Finishing off!
To complete your cake, spread a generous helping your favourite jam on one half of the sponge, and butter icing on the other, before sandwiching together!
Top with a light dusting of icing sugar and done! One lovely, yummy Victoria Sponge Cake!
Lining the tins
For me, lining your tins properly is crucial for sponge making. There is nothing worse than taking your beautiful, perfect sponges out of the oven and finding you can't get the bloody things out of the tins!! I never rely on "non stick" tins either. Assume every tin will stick! Lining tins isn't difficult, but can be a bit fiddly if you're new to it. So here is a quick step-by-step for lining round cake tins.
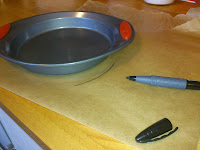
You will need:- A knob of butter
- Your cake tins (obviously!)
- Greaseproof paper
- A pen
- Scissors
2. Measure the circumference of the tin (that's all the way around the edge folks!) and cut a strip of greaseproof paper to length adding 4cm for overlap.
3. Fold the strip in half length-ways and then make cuts into the middle of the paper every 1-2cm.
4. Grease your tins with butter making sure to get all the corners!
5. Place the long strip against the side of the tin, with the cuts edges on the base. The cuts will overlap, allowing you to easily bend the strip to the curve.
6. Add the circle of paper to the base, and your ready to bake!


